Description
Stringer Java Obfuscator safeguards Java application binaries (JARs, Java 9 Modules, OSGI, WARs, EARs, Eclipse RCP) against reverse engineering and modification.
Features
- Encryption of Strings
- Encryption of Resources
- Hiding Method Calls, Field Types, and Field Access
- Integrity control: Certificate Checks, JAR Content Checks, JAR sealing, Runtime Integrity Checks
- Tamper Notifications
- Anti-Emulator
- Java Code Anti-Debugging
- Resource Name Obfuscation
- Transparent SSL Pinning / HTTP Public Key Pinning (HPKP)
- Watermarking
- Secure Code Execution Environment
Note: Some of the features are available in the Enterprise version only. Please see the feature matrix.
String Encryption
Encryption of strings is used to hide the contents of string constants in Java applications. It is based on a strong cryptographic algorithm with the dynamic keys. These keys are calculated during the work of the protected application based on many parameters, and they can't be extracted from the application's code. As a result, if the code is decompiled, the contents of strings will be hidden and will be inaccessible for static analysis and decryption.
Note: We recommend to encrypt strings that contain sensitive data (logins, passwords, API credentials, keys, and so on), it’s also useful to encrypt some more strings in order to knock a malicious person out of the way, and to make the reverse engineering task much more complicated. A good approach is to have as many strings encrypted as possible until it is ok for the performance of the application. We do not recommend to use String Encryption for strings in open source libraries and for insensitive strings, because it may lead to a negative performance impact.
Hide Access
Hiding of method calls allows protecting the critical places of an application from the analysis and modification. This mechanism masks the calls of library methods and application methods with the dynamic functions constructed in a special way. It also hides field types and accesses to fields.
Note: It is recommended using this function only for classes which logic must be protected from analysis and modification, for example, critical application's logic, work with the license, etc.
Note: This technique allows you to hide Java API calls or third-party API calls you use in your project, if your bytecode targeted to Java 7 it hides calls to methods with use 'invokedynamic' engine, so that it is almost impossible to decompile protected code and to figure out which method is going to be called in a certain place. It is also a part of our anti-decompiler technique.
Resource Encryption
For extra protection, Stringer may also encrypt resources — images, media clips, and other data files that are part of your application — using a modified AES algorithm. Encryption keys are different for each application, providing the best in class protection. The process is completely transparent to the application and requires no changes to its source code or build steps. You may precisely define the list of resources that should be protected using filters. Stringer Enterprise allows you to transparently obfuscate names of resource files.
Integrity Control/Tamper Resistance
A binary processed by Stringer with integrity protection enabled will not function if damaged or deliberately modified. This makes it impossible for hackers to disable a licensing subsystem or inject malicious code in your app, e.g. to obtain sensitive information such as passwords or credit card numbers of your application's users. Stringer Enterprise allows you to manually configure the integrity control function: enable/disable the JAR’s signature check, JAR’s contents check and tamper detection/notification - how the protected application behaves after it was modified.
Tamper Notifications
Stringer Enterprise allows you to set actions that will be performed when there have been attempts to modify applications' content and/or the signature.
Application Size Optimization
Stringer Java Obfuscator can optionally optimize the processed class files for size by deleting redundant information such as debugging data, local variable names, etc. These optimizations may effectively nullify the decryption/integrity control overheads.
Performance Tuning
In order to eliminate the negative performance impact, it is needed to consider which classes/strings and resources should be protected. The set of classes/resources that should be protected can be specified with the help of a filter (filter format). If you need more detailed adjustment, for example, protection of class methods or individual fields, you can use the annotations mechanism (annotations). We recommend to set filters for classes where you have sensitive strings for String Encryption, classes where you have valuable logic - Hide Access, and add filters for valuable resources. And we would also recommend excluding all the open source libraries.
If no filters specified and corresponding functions are enabled, Stringer protects all the strings in all the classes (String Encryption), all the classes and method calls, fields (removes types) and field accesses in all the classes (Hide Access), encrypts resources (Resource Encryption).
There is a reference configuration file stringer.xml in the root folder of the distribution kit. It has exclusions for widespread open source libraries. String Encryption, Hide Access are enabled in this configuration. If you do not have your own configuration yet, we recommend to start with the reference configuration and then add settings that are relevant to your applications.
General information
Stringer Java Obfuscator works with the following inputs:
- Directory with class files and resources
- JARs with classes and resources
- Java 9 Modules (Experimental feature)
- OSGI, WARs, EARs, Eclipse RCP projects (Enterprise version only)
Stringer can be configured to protect separate directories with classes/JAR files, as well as containers that carry directories with classes/JAR files inside, for example, WARs/EARs/etc. (Enterprise version only)
Protecting an ordinary JAR file example:
<protectionElements>
    <protectionElement>
        <stringEncryption/>
        <hideAccess/>
    </protectionElement>
</protectionElements>
Protecting a container example (WAR):
    <protectionElements>
        <protectionElement>
            <path>WEB-INF/classes</path>
            <stringEncryption/>
            <hideAccess/>
            <integrityControl>
                <checkBytecode>true</checkBytecode>
            </integrityControl>
        </protectionElement>
        <protectionElement>
            <paths>
                <path>WEB-INF/lib/mylib-3.1.jar</path>
                <path>WEB-INF/lib/license-3.1.jar</path>
            </paths>
            <stringEncryption/>
            <hideAccess/>
            <integrityControl>
                <checkBytecode>true</checkBytecode>
                <checkJar>true</checkJar>
            </integrityControl>
        </protectionElement>
    </protectionElements>
As a result of protection, Stringer generates a protected file/directory of the same format as the input.
IMPORTANT: If you use a name obfuscator alongside Stringer, for example, ProGuard, in your build chain, it is needed to follow the requirements below:
- Stringer must be the last step of your build chain
If you use annotations to configure Stringer they should be preserved, here is an example for ProGuard:
-keepattributes SourceFile, LineNumberTable, *Annotation* -keep @interface com.stringer.annotations.** { *; }- To be able to use original class names in the configuration, instead of using obfuscated names, you might set proguardMappingFile in Stringer's configuration.
You can access all Stringer features from the command line or invoke it from automated build systems such as Ant, Maven or Gradle, or use the Eclipse plugin. The GUI provides a limited functionality: String Encryption, Hide Access, Resource Encryption, Integrity Control, and signing.
Stringer Java Obfuscator works under JRE ≥ 1.7. It can process Java applications compiled for J2SE 5.0 and up.
Package Contents
Stringer is distributed as a zip archive containing the following files:
- Command-line interface:
stringer.jar(executable JAR file) - Graphical interface:
stringer-gui.jar(executable JAR file) - Application for macOS:
Stringer-GUI.app - Annotations JAR:
stringer-annotations.jar - Gradle Plugin:
stringer-gradle.jar - Maven Plugin:
stringer-maven-plugin.jar - Reference configuration file and build scripts:
stringer.xml,samples/ - License texts:
NOTICE, LICENSE
Using CLI and GUI
Downloading
The download link will be sent with an activation code via email after requesting a trial license, or after purchasing a full license(s).
Installation
Unpack the zip file to the destination folder.
Obtaining the activation code
To get a fully functional activation code, purchase the required number of licenses. In this case, registration is obligatory. You can register by entering your email address when purchasing the license. Further instructions how to set your password and installation directions will be sent to the email address you provided during the checkout process.
When purchasing the product via FastSpring the activation codes are sent within 24 hours after the funds are received. If a contract is signed with a company, the activation codes are sent after receipt on account or after a copy of a payment order is submitted.
The license information will be displayed on your profile. The license status will be displayed as: Generated – meaning that the license code is generated but not used or Activated - meaning the activation code is used. Your login is your email you used when ordering Stringer Java Obfuscator.
The activation code is single-use. It means you have to contact the customer support to get a new code if the original license file was lost.
Stringer Java Obfuscator supports two activation methods: online and offline. If you have an active Internet connection you may use online activation. If you have not Internet connection, or if it is limited by various traffic filter systems you should use offline activation. In this case, it is necessary to generate activation request code using CLI or GUI, and send it to primary@licelus.com via email. You can do it from another computer or a device which has an active Internet connection.
CLI
Online activation via CLI
To activate Stringer Java Obfuscator online in the console mode, run the following command:
java -jar stringer.jar -activate
and follow the instructions.
After successful activation the license file stringer.licel will be created in the user's home folder.
To use a license file located in a different folder and not in the same folder with stringer.jar, it is necessary to specify the path to the license file.
Offline activation via CLI
In order to activate license offline run the following command:
java -jar stringer.jar -activationRequest
After you enter an activation code a request code will be generated. You should email this code to primary@licelus.com. In 24 hours you will receive response code, then run the following command:
java -jar stringer.jar -activationResponse
Enter the code you have received. After successful activation the license file stringer.licel will be created in the user's home folder.
To use a license file located in a different folder and not in the same folder with stringer.jar, it is necessary to specify the path to the license file.
Options and parameters
java -jar stringer.jar <options> <src> <dest>
Valid values <src>:
The original file or directory.
Valid values <dest> (may be the same as <src> except for directories):
Path to destination file or directory. If the <dest> doesn't exists it will be created. By default, type of <dest> is equal to <src>.
Valid values <options>:
-activate- activate the license-activationRequest- generate request code for offline activation-activationResponse- finish offline activation process, enter response code-info- license status-licenseFilefilename - path to license file-configFilefilename - use the configuration parameters from the specific file (Configuration file format)-proguardMapFile- path to ProGuard’s map file-verbose- print verbose log to stdout (default: off)-trialExpirationTimestamp- end of working period of a protected application, in seconds from Epoch/unix time-trialExpirationTimestampPattern- pattern to be used intrialExpirationTimestampparameter (syntax is similar toSimpleDateFormatclass), for example 'yyyyMMdd'
GUI
Online activation via graphic interface
To activate license online in the GUI double-click on stringer-gui.jar (Windows/Linux) or Stringer-GUI.app (MacOS).
Click the License Info in the application window.
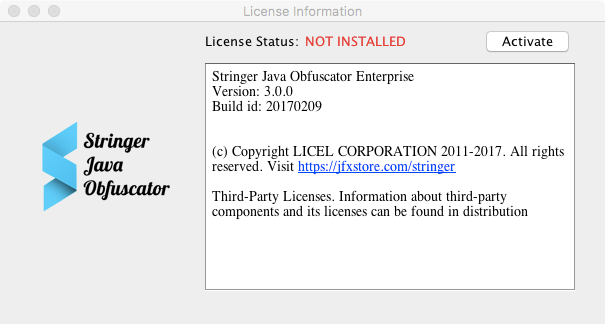
Then click Activate, enter the activation code and click Activate online.
After successful activation file stringer.licel will be created in the user's home folder.
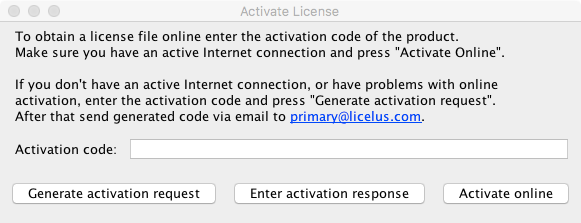
Offline activation via graphic interface
In order to activate license offline in the GUI double-click on stringer-gui.jar (Windows/Linux) or Stringer-GUI.app (MacOS).
Click the License Info in the application window.
Click the Activate, enter the activation code and click Generate activation request.
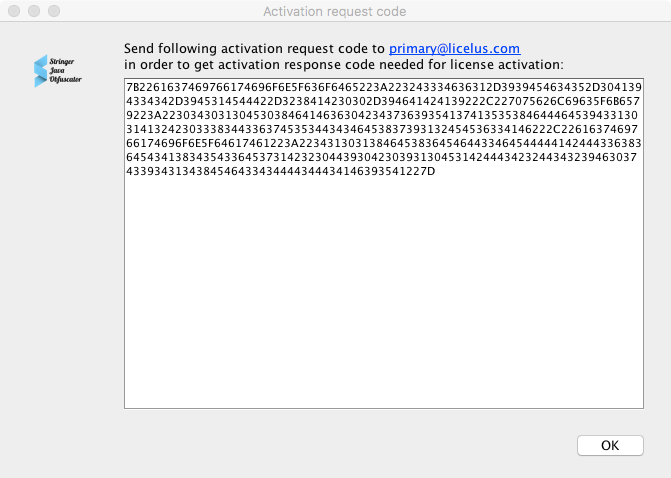
You should email this code to primary@licelus.com. In 24 hours you will receive a reply with an activation response. It is necessary to enter the code in a field which will appear after clicking Enter activation response. In case if you turned Stringer Java Obfuscator off, run it again and follow License Info -> Activate -> Enter activation response.
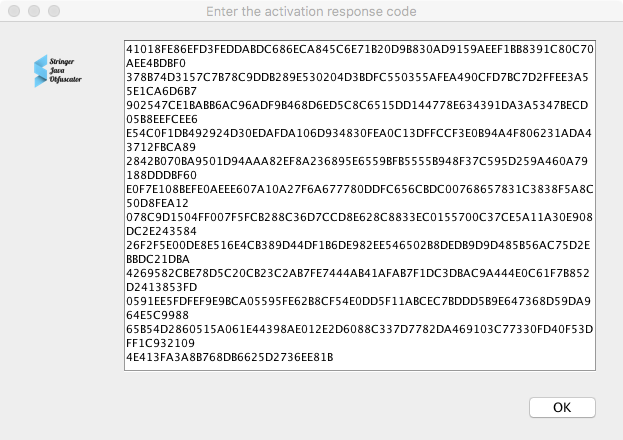
stringer.licel will be created in the user's home folder.
Options and parameters
IMPORTANT: Stringer GUI does not support all the features that are provided. To access all the functions please use the CLI and a configuration file, or Ant/Maven/Gradle plugins. The GUI supports JARs and directories with classes and resources as an input only.
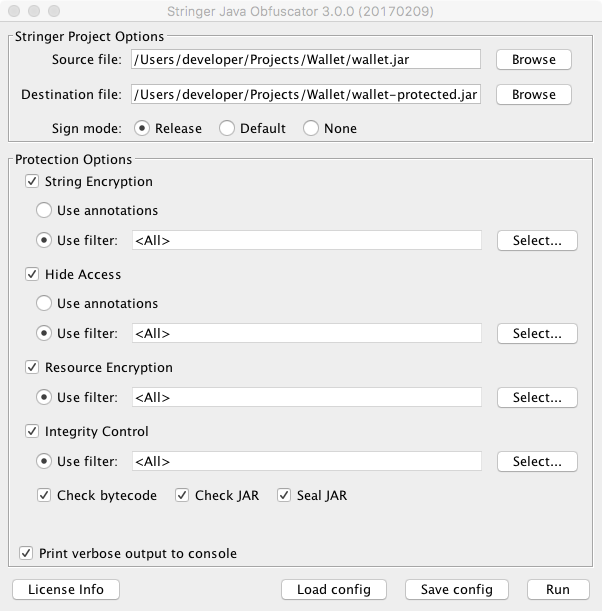
Source file - the original JAR file or path to a directory containing classes.
Destination file - the protected JAR file or path to a directory that will contain protected classes. Source file can be equal to Destination file in case a JAR is being protected. If a directory is to be protected the path must be different. If Destination file does not exist it will be created. By default, type of Destination file is the same as Source file.
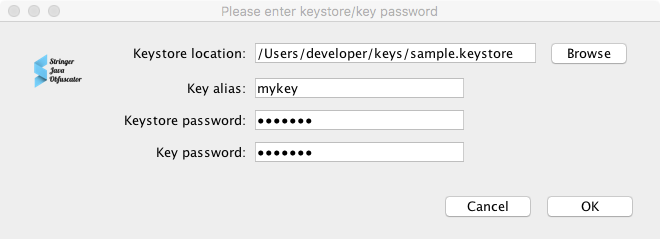
Sign mode - mode of signing the output JAR file (available for JAR files only). The JAR file can be signed in two modes: Default and Release. In the case of the Release mode, it is necessary to specify a keystore, key alias, keystore password and key password in a special dialog window which appears in case the protection process is initiated. None signature mode means no signature will be added.
Protection Options:
- String Encryption – turn on/off the string encryption (default: off)
- Hide Access – turn on/off hiding the API calls (default: off)
- Resource Encryption – turn on/off the resource encryption (default: off)
- Integrity Control – turn on/off the integrity control mechanism (default: off)
To setup the filter, it is necessary to select Use filter, click the Select button and specify classes which need to be protected in the displayed window. See Filter format section for details.
You can do the following with the help of the filter: * Encrypt the string constants in a class or classes which correspond to the pattern * Hide API calls in a class or classes which correspond to the pattern * Encrypt resource files which correspond to the pattern
Control elements:
License Info- the license status and activationLoad config- load settings from a configuration fileSave config- save settings to a configuration file You can use the saved file with settings when using String Java Obfuscator in other modes, i.e. Ant/Maven/Gradle/CLIRun- run obfuscation
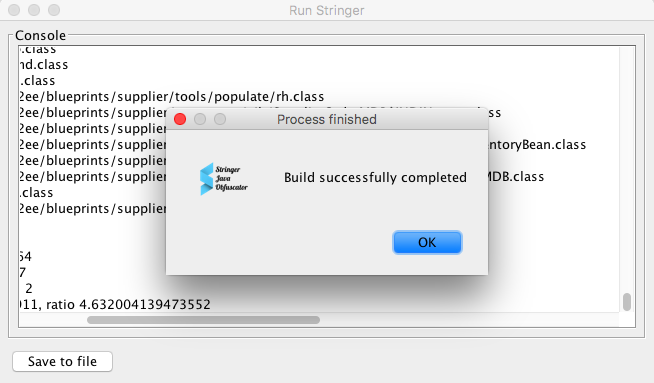
After startup, the information about the protection process and the debugging information are displayed if the option Print verbose output to console is enabled. You can click Save to file button to save the log to a file.
Using as Ant-task
NOTE: To use Stringer Java Obfuscator as an Ant task, it is necessary to download the obfuscator distribution kit, complete installation, receive the activation code and use it for obtaining your license following the instructions Using CLI and GUI. The license can be activated via GUI or CLI.
To add Stringer Java Obfuscator task to an Ant script, add the following to your ant script (build.xml by default):
<taskdef name="stringer" classname="com.licel.stringer.AntTask" classpath="${stringer.home}/stringer.jar" />
To call a stringer task:
<stringer srcFile="${src.jar}" destFile="${dest.jar}"/>
The additional parameters can be specified in the outer configuration file:
<stringer srcFile="${src.jar}" configFile="${stringer.config}" destFile="${dest.jar}"/>
Or you can specify it inside the task, please see Configuration file format Section section.
Example:
<stringer srcFile=”${src.jar}” destFile=”${dest.jar}”>
<verbose>true</verbose>
<protectionElements>
    <protectionElement>
        <stringEncryption>
                <mode>filter</mode>
                <checkCaller>true</checkCaller>
                <filters>
                    <filter>glob:com/sample/Library/**</filter>
                </filters>
        </stringEncryption>
    </protectionElement>
</protectionElements>
</configuration>
Using as Maven-plugin
NOTE: To use Stringer Java Obfuscator's Maven plugin, it is necessary to download the obfuscator distribution kit, install the Stringer, get the activation code and use it for obtaining your license following the instructions here: Using CLI and GUI.
IMPORTANT: Stringer Maven Plugin is executed on package phase. In order to build your protected project, please use usual commands: mvn clean install, mvn clean deploy or mvn clean package.
First it is needed to install all the required artifacts (POM files are shipped within the distribution package):
mvn install:install-file -Dfile=$STRINGER_HOME/stringer.jar -DpomFile=$STRINGER_HOME/stringer.pom
mvn install:install-file -Dfile=$STRINGER_HOME/stringer-maven-plugin.jar -DpomFile=$STRINGER_HOME/stringer-maven-plugin.pom
mvn install:install-file -Dfile=$STRINGER_HOME/stringer-annotations.jar -DpomFile=$STRINGER_HOME/stringer-annotations.pom
Example:
mvn install:install-file -Dfile=`pwd`/stringer.jar -DpomFile=`pwd`/stringer.pom
mvn install:install-file -Dfile=`pwd`/stringer-annotations.jar -DpomFile=`pwd`/stringer-annotations.pom
mvn install:install-file -Dfile=`pwd`/stringer-maven-plugin.jar -DpomFile=`pwd`/stringer-maven-plugin.pom
Stringer should be executed at the prepare-package phase (to protect Java class files, for example, WEB-INF/classes) or package phase (to protect JAR artifacts) of a lifecycle of a project build. To use it, it is necessary to add a plugin definition to the build/plugins pom.xml section.
Settings can be specified in the outer configuration file:
<project>
  ...
  <build>
    <plugins>
            ...
            <plugin>
            <!-- STRINGER MUST BE THE LAST ONE IN A BYTECODE TRANSFORMATION CHAIN, I.E. THE LAST ONE BEFORE SIGNING PLUGINS IF THERE ARE ANY -->
                <groupId>com.licel</groupId>
                <artifactId>stringer-maven-plugin</artifactId>
                <version>${stringer.version}</version>
                <executions>
                    <execution>
                        <phase>package</phase>
                        <goals>
                            <goal>stringer</goal>
                        </goals>
                        <configuration>
                           <configFile>${stringer.config}</configFile>
                        </configuration>
                    </execution>
                </executions>
            </plugin>
           ...
      </plugins>
  </build>
  ...
</project>
Or you can specify it inside the configuration element, please see Configuration file format Section section.
<configuration>
<verbose>true</verbose>
<protectionElements>
    <protectionElement>
        <stringEncryption>
                <mode>filter</mode>
                <checkCaller>true</checkCaller>
                <filters>
                    <filter>glob:com/sample/Library/**</filter>
                </filters>
        </stringEncryption>
    </protectionElement>
</protectionElements>
</configuration>
Using as Gradle-plugin
Note: To use Stringer Java Obfuscator as Gradle-plugin, it is necessary to download the distribution kit, get the activation code and use it for obtaining your license following the instructions here: Using the console and graphic modes. There are two ways to activate your license: Activation via CLI or Activation via GUI.
Set the path to Stringer Java Obfuscator in your
buildscript.repositories, for example:flatDir { dirs '/Users/developer/Stringer' }Add the following dependencies:
classpath ':stringer-gradle-plugin:'
classpath ':stringer:'
Protecting Java Applications
Add into a Java Application's build.gradle file the following line after
apply plugin: 'java':apply plugin: 'stringer'- Stringer's Gradle plugin automatically detects which of the following parameters should be used. In case you need to customize them there are the properties that can be changed:
Property: licenseFile
Description: Path to the license file
Format: string
Default value: ${user.home}/stringer.licel
Example:
licenseFile /Users/developer/stringer.licel
Property: srcFile
Description: Path to the file (JAR, WAR, EAR, etc.) or directory with classes or JARs that is to be protected
Format: string
Default value: $jar.archivePath
Example:
srcFile "${projectDir}/build/in.jar"
Property: destFile
Description: Path to the protected file (JAR, WAR, EAR, etc.) or directory with protected classes or JARs
Format: string
Default value: $jar.archivePath
Example:
srcFile "${projectDir}/build/in_protected.jar"
Property: proguardMapFile
Description: Path to ProGuard's map file (class name mapping after name obfuscation)
Format: string
Default value: $proguard.printmapping
Example:
proguardMapFile "${projectDir}/build/mapping.txt"
Property: runAfter
Description: A task after which Stringer should be executed
Format: string
Default value: assemble
Example:
runAfter customAssemble
Add a section describing the Stringer's task:
stringer {
    configFile "${projectDir}/stringer.xml"
    // Advanced settings:
    // licenseFile "/Users/developer/stringer.licel"
    // srcFile jar.getArchivePath()
    // destFile jar.getArchivePath()
    // proguardMapFile "${projectDir}/build/outputs/proguard/.../mapping.txt"
    // runAfter jar
}
Thus, it should look like this:
        buildscript {
            repositories {
                jcenter()
                flatDir dirs: '../..'
            }
        dependencies {
            classpath ":stringer-gradle-plugin"
            classpath ":stringer"
            }
        }

        apply plugin: "java"
        apply plugin: "stringer"

        stringer {
            configFile "${projectDir}/stringer.xml"
        }
Using as Eclipse plugin
Note: Supports Eclipse starting from Mars version.
- Download Stinger Java Obfuscator Eclipse Plugin here, it is also located in the root folder of the distribution package.
- Copy
com.licel.stringer.ide.eclipse.jdt.ui.jarintodropinsfolder of your Eclipse installation - Restart Eclipse
- During the first run of the wizards (
JAR File protected by StringerExport Wizard andRunnable JAR File protected by StringerExport Wizard) set the following properties:- path to installed copy of Stringer Java Obfuscator
- path to the license file
- path to a configuration file
- path to a log file
Note: If you are set a
configurationfile and alogfile to be in the project's directory, please make sure they are excluded from the files to be exported.
Using in NetBeans
Ant-based Projects
Edit
build.xmlof the project you want to protect. And add thestringerAnt task defenition:<taskdef name="stringer" classname="com.licel.stringer.AntTask" classpath="${stringer.home}/stringer.jar"/>Add the
stringertask call after project compilation:
<target name="-post-jar">
    <stringer srcFile="${dist.jar}"    destDir="${dist.jar}">
        <!-- Place Stringer Java Obfuscator Config here -->
    </stringer>
</target>
Additional settings described in Using as Ant-task.
JavaFX Projects
Edit
build.xmlof the project you want to protect. And add thestringerAnt task defenition:<taskdef name="stringer" classname="com.licel.stringer.AntTask" classpath="${stringer.home}/stringer.jar"/>Add the
stringertask call:
<target name="-post-jfx-jar">
    <stringer srcFile="${jfx.deployment.dir}${file.separator}${jfx.deployment.jar}" destFile="${jfx.deployment.dir}${file.separator}${jfx.deployment.jar}">
        <!-- Place Stringer Java Obfuscator Config here -->
    </stringer>
</target>
Additional settings described in Using as Ant-task.
Maven-based Projects
If you use Maven to build a project in NetBeans then follow the instructions Using as Maven-plugin.
Configuration file format
    <?xml version="1.0" encoding="UTF-8" standalone="no"?>
    <stringer-v3>
        <verbose/>
        <licenseFile/>
        <optimize/>
        <signMode/>
        <keystore/>
        <storepass/>
        <alias/>
        <keypass/>
        <proguardMapFile/>
        <trialExpirationTimestamp/>
        <trialExpirationTimestampPattern/>
        <protectionElements>
            <protectionElement>
                <paths>
                    <path/>
                    ...
                </paths>
                <stringEncryption>
                    <mode/>
                    <checkCaller/>
                    <filters>
                        <filter>...</filter>
                    </filters>
                </stringEncryption>
                <hideAccess>
                    <mode/>
                    <filters>
                        <filter>...</filter>
                    </filters>
                </hideAccess>
                <resourceEncryption>
                    <mode/>
                    <filters>
                        <filter>...</filter>
                    </filters>
                </resourceEncryption>
                <integrityControl>
                    <checkBytecode/>
                    <checkJar/>
                    <sealJar/>
                    <osgiCompatibility/>
                    <mode/>
                    <filters>
                        <filter>...</filter>
                    </filters>
                </integrityControl>
            </protectionElement>
        …
        </protectionElements>
    </stringer-v3>
Element: verbose
Description: Sets verbosity level to maximum
Format: boolean
Default value: false
Example: <verbose>true</verbose>
Element: licenseFile
Description: Path to the license file
Format: string
Default value: ${user.home}/stringer.licel
Example: <licenseFile>/Users/developer/stringer.licel</licenseFile>
Element: optimize
Description: Enables the class optimisation mode
Format: boolean
Default value: false
Example: <optimize>true</optimize>
Element: signMode
Description: Sets mode of signing of the output JAR file
Format: string
Valid values: default - signature is performed with an autogenerated key, release - signature is performed with the developer's key, none – signature is not performed)
Default value: none
Example: <signMode>release</signMode>
Element: keystore (only for signMode == release)
Description: Path to the keystore
Format: string
Default value: no default value
Example: <keystore>/Users/developer/.keystore</keystore>
Element: storepass (only for signMode == release)
Description: Password for the keystore
Format: string
Default value: no default value
Example: <storepass>password</storepass>
Element: alias (only for signMode == release)
Description: Key alias in the keystore
Format: string
Default value: no default value
Example: <alias>java</alias>
Element: keypass (only for signMode == release)
Description: Password for the key
Format: string
Default value: no default value
Example: <keypass>password</keypass>
Element: proguardMapFile
Description: Path to ProGuard's map file (class name mappings after name obfuscation)
Format: string
Default value: no default value
Example: <proguardMapFile>/Users/developer/project/proguard_map.txt</proguardMapFile>
Element: trialExpirationTimestamp
Description: Time points to the end of working period of a protected application. By
default, the value is to be set in seconds (unix time/Epoch)
Format: string
Default value: no default value
Example: <trialExpirationTimestamp>20180101</trialExpirationTimestamp>
Note: JEXL expressions might be used to set trialExpirationTimestamp
Element: trialExpirationTimestampPattern
Description: Pattern that is used to parse a value of trialExpirationTimestamp.
Format: string
Default value: no default value
Example: <trialExpirationTimestampPattern>yyyyMMdd</trialExpirationTimestampPattern>
Element: protectionElements (Standard/Enterprise)
Description: Elements that are to be protected
Format: contains nested elements
Nested elements: (list of <protectionElement>)
Element: protectionElement (one or more for the Enterprise/one for the Standard version)
Format: contains nested elements
Nested elements (<paths/> - Only for Enterprise, Not Allowed in the Standard version, <stringEncryption/>, <hideAccess/>, <resourceEncryption/>, <integrityControl/>)
Default value: no default value
Element: paths (Enterprise Only)
Description: Paths to the JAR files/directories to be protected inside of the main container (archive or directory)
Format: contains nested elements
Nested elements (List of <path/> tags)
Element: path (one or many)
Format: string
Default value: no default value
Element: stringEncryption
Description: Encrypt Strings in the input class files in accordance with the filter/annotations.
Format: contains nested elements
Nested elements (<mode>, <checkCaller>, <filters>List of <filter/> tags</filters>) (Only for <mode>filter</mode>):
Element: mode
Format: string
Valid values: off- disable encryption of strings, filter – strings are encrypted in accordance with the filters set in annotations – strings to be encrypted are configured via annotations.
Default value: filters
Example: <mode>filter</mode>
Element: checkCaller
Description: Enable the call context checks
Format: boolean
Valid values: true- the call context checks are enabled, false – disable the checks.
Default value: true
Example: <checkCaller>false</checkCaller>
Element: filter (Many)
Format: string
Default value: no default value
Example: <filter>glob:com/sample/Library/**</filter>
Example (filters):
<stringEncryption>
    <mode>filter</mode>
    <checkCaller>true</checkCaller>
    <filters>
        <filter>glob:com/sample/Library/**</filter>
    </filters>
</stringEncryption>
Example (annotations):
<stringEncryption>
    <mode>annotations</mode>
</stringEncryption>
Element: hideAccess
Description: Hides accesses to methods/fields in the input class files in accordance with the filter/annotations.
Format: contains nested elements
Nested elements (<mode>, <filters>List of <filter/> tags</filters>) (Only for <mode>filter</mode>):
Element: mode
Format: string
Valid values: off - protection of field accesses and method calls is disabled, filter – the hide access is applied in accordance with <filters>, annotations – the hide access is applied in accordance with annotations.
Default value: filters
Example: <mode>filter</mode>
Element: filter (Many)
Format: string
Default value: no default value
Example: <filter>glob:com/sample/Library/**</filter>
Example (filters):
<hideAccess>
    <mode>filter</mode>
    <filters>
        <filter>glob:com/sample/Library/**</filter>
    </filters>
</hideAccess>
Example (annotations):
<hideAccess>
    <mode>annotations</mode>
</hideAccess>
Element: resourceEncryption
Description: Encrypt resources in the input JAR or directory
Format: contains nested elements
Nested elements (<filters>List of <filter/> tags</filters>) (Only for <mode>filter</mode>):
Element: filter (Many)
Format: string
Default value: no default value
Example: <filter>*.html</filter>
Example:
<resourceEncryption>
        <filters>
            <filter>*.html</filter>
        </filters>
</resourceEncryption>
Element: integrityControl
Description: Controls the configuration of the tamper resistance module
Format: contains nested elements
Nested elements (<checkBytecode/>, <checkJar/>, <sealJar/>, <mode/>, <filters>List of <filter/> tags</filters>):
Element: checkBytecode
Description: Enables the integrity checks at the bytecode level
Format: boolean
Valid values: true - enable bytecode checks, false - disable bytecode checks
Default value: true
Example: <checkBytecode>false</checkBytecode>
Element: checkJar
Description: Enables integrity check at the level of JAR
Format: boolean
Valid values: true - enable JAR check, false - disable JAR check
Default value: true
Example: <checkJar>false</checkJar>
Element: sealJar
Description: Controls JAR sealing (see https://docs.oracle.com/javase/tutorial/deployment/jar/sealman.html)
Format: boolean
Valid values: true - enable JAR sealing, false - disable JAR sealing
Default value: true
Example: <sealJar>false</sealJar>
Element: osgiCompatibility
Description: Switches the protection mechanisms to the mode that is compatible for OSGI containers
Format: boolean
Default value: false
Example: <osgiCompatibility>true</osgiCompatibility>
Element: mode
Format: string
Valid values: off - the integrity protection is disabled, filter – the function is applied in accordance with <filters>
Default value: filters
Example: <mode>filter</mode>
Element: filter (Many)
Format: string
Default value: no default value
Example: <filter>glob:com/sample/Library/**</filter>
Example:
<integrityControl>
    <checkBytecode>true</checkBytecode>
    <checkJar>true</checkJar>
    <sealJar>true</sealJar>
    <osgiCompatibility>true</osgiCompatibility>
    <mode>filter</mode>
    <filters>
        <filter>glob:com/sample/Library/**</filter>
    </filters>
</integrityControl>
Filter format
Stringer Java Obfuscator provides a flexible mechanism of setting the filters for its protection functions. You can use glob or regex syntax modes. Wherein it is possible to use exclusions by placing ! before the filter's expression.
Let us see at different filter settings (glob syntax is used in the following examples).
Say we want to configure a String Encryption's filter and we have got the following structure of packages:
    com/google/..
    com/mycompany/..
    com/mycompany/ui/..
    com/mycompany/core/..
- Protection of certain packages
In order to protect the com/mycompany package (i.e. all the classes that lie under com/mycompany) we should set the following filter:
glob:com/mycompany/**
2. Protection of a certain class
To protect a single class, for example com/mycompany/core/InternalEngine.class we use the following filter:
glob:com/mycompany/core/InternalEngine*
3. Exclusion of certain packages from processing
Here is an example of how to exclude a certain package or packages from processing:
glob:!com/google/**
In this case, a result will be the same as in the first case, where we included everything except com/google. And in the second example, we excluded everything except com/mycompany.
Exclusion for a single class is made in the same way and it is needed to place ! before the class name:
glob:!com/mycompany/core/BumpGenerator*
4. Mixed configuration
Stringer allows using inclusions and exclusions at the same time. When doing that keep in mind the following logic:
- At first we add an exclusion filter for all the packages and classes
- Set include filters
- Add exclude filters for certain packages and/or classes
In other words, Stringer reads and applies rules from the top to the bottom.
For example:
    glob:!**/**
    glob:com/mycompany/**
    glob:!com/mycompany/ui/**
    glob:com/mycompany/ui/Payment*
As a result all the classes from com/mycompany and com/mycompany/core are protected, and the com/mycompany/ui/Payment.class is protected as well. Remaining classes from com/mycompany/ui are leaved untouched.
The same approach is used for all the functions that use filters, i.e. Hide Access, Resource Encryption.
Please see stringer.xml file in the root folder of the distribution kit for additional examples.
Detailed syntax information
Filter is to be defined by the syntax and the pattern and takes the form: syntax:pattern, where ':' stands for itself.
Two syntaxes are supported: the "glob" and "regex". The value of the syntax component is compared without regard to case. When the syntax is "glob" then the String representation of the path is matched using a limited pattern language that resembles regular expressions but with a simpler syntax. For example:
*.*
Matches file names containing a dot.
foo.?
Matches file names starting with foo. and a single character extension.
com/*/*
Matches package /com/test/a.
com/**
Matches all packages and classes inside a com package.
The following rules are used to interpret glob patterns:
- The
*character matches zero or more characters of a name component without crossing directory boundaries. - The
**characters matches zero or more characters crossing directory boundaries. - The
?character matches exactly one character of a name component. - The backslash character (
\) is used to escape characters that would otherwise be interpreted as special characters. The expression\\matches a single backslash and\{matches a left brace for example. - The
[ ]characters are a bracket expression that matches a single character of a name component out of a set of characters. For example,[abc]matches "a", "b", or "c". The hyphen (-) may be used to specify a range so[a-z]specifies a range that matches from "a" to "z" (inclusive). These forms can be mixed so [abce-g] matches "a", "b", "c", "e", "f" or "g". If the character after the[is a!then it is used for negation so[!a-c]matches any character except "a", "b", or "c". Within a bracket expression the*,?and\characters match themselves. The-character matches itself if it is the first character within the brackets or the first character after the!if negating. - The
{ }characters are a group of subpatterns, where the group matches if any subpattern in the group matches. The,character is used to separate the subpatterns. Groups cannot be nested. - Leading period/dot characters in the file name are treated as regular characters in match operations. For example, the
*glob pattern matches file name ".login". - The
!character in the beginning of the pattern component negates the pattern.
When the syntax is "regex" then the pattern component is a regular expression composed in accordance with java regex rules.
Note: If the syntax is not set (
glob:orregex:) old filter format will be used in order to preserve backward compatibility with Stringer’s versions < 3.0.
Annotations
To fine tune your protection process, you can use annotations. Annotations will be used only if you will enable the corresponding parameters in your configuration. You can enable annotations for String Encryption and Hide Access, the annotations are respectively: @StringEncryption and @HideAccess. If there are the annotations in a project then class files and/or their elements marked with the annotations will be protected.
The @StringEncryption annotation can be used at the following hierarchy levels:
Class field - a specified class String is encrypted:
import com.stringer.annotations.*;

public class Test {
 @StringEncryption
  final String SOME_TEXT="12345678";
   ....
}
Class - all Strings of the class are encrypted:
...
import com.stringer.annotations.*;

@StringEncryption
public class Test {
   ....
}
Class method - all Strings of the method are encrypted:
import com.stringer.annotations.*;

public class Test {
   ....
  @StringEncryption
  public void someMethod(){
     ...
  }
   ....
}
The @HideAccess annotation can be used at the following hierarchy levels:
Class - all calls of all class methods are hidden:
...
import com.stringer.annotations.*;

@HideAccess
public class Test {
   ....
}
To use the annotations in your projects, add the stringer-annotations.jar library from the distribution kit to the project classpath.
Samples
Sample projects are availble on GitHub.
Uninstallation Information
In order to uninstall Stringer Java Obfuscator from your computer, please delete your STRINGER_HOME directory (where you unpacked the distribution kit) and your license file, it is located in your home folder and called stringer.licel. If you are using Eclipse plugin as well, simply delete the plugin com.licel.stringer.ide.eclipse.jdt.ui.jar from the dropins folder of Eclipse and restart it.
Last update: 03.09.2019 - 19:15